Deep Dive: Mountain Bike Lights
When the Sun Sets, the Ride Doesn’t Have To
Time to ride feeling scarce these days? You’re not the only one.
With daylight savings hitting yesterday, this time of year has always been a tough proposition for me. Having a strong bias towards riding outdoors, and with afternoons to evenings being my preferred window to get out, the gradual loss of daylight and time to ride tends to come with a longing for long summer days, and an ominous vibe for the cold, dark days ahead.
The good news is that there’s light at the end of the tunnel (here for the dad jokes), and dark, shorter days don’t have to be an automatic downer. Quite the opposite, it’s an opportunity to keep the pedals turning, extend those good vibes, and to experience familiar trails in an entirely new way.
My lightbulb moment on night riding came two years ago in late autumn, during one of my weekly rips on Parley’s Pointe, a popular trail in the East Bench foothills of Salt Lake City. Riding at dusk and quickly running out of quality light, I happened to run into Contender owner Ryan Littlefield, fully kitted out with handlebar and helmet lights, lumens cutting through the darkness as he zipped along. I asked him about his setup, and the thing I recall the most was the grin he flashed when explaining how lights extend the day and the season, flipping the script from a feeling of scarcity–to abundance.

Above: this image shows the rider's handlebar and helmet lights both pointing straight forward, which mimics a single light setup on the handlebars. The upside is full brightness on your immediate horizon, but the downside is limited visibility into where you're going, and the ability to see down-trail.

Above: here, the rider's handlebar light is aimed straight ahead, while the helmet light looks down-trail, illuminating the left hand berm and where the trail is going. The net of the helmet or second light is increased visibility, enhanced depth perception, and greater confidence to keep rolling through fast, flowy, and technical terrain.
I quickly sprang for two lights–one for my helmet, one for my bars–and the rest is history. For the 2024 season, I was able to log an additional 15-20 rides by hitting the trails mid-dusk or fully in the dark, after dinner was done and my kids in bed. Like finding a $20 bill in an old pair of jeans, the realization I could ride after dark, when getting out on a given day felt like a lost cause, is something I still revel in.
Ready to flip the switch on riding at night?
Below, you’ll find Contender’s recommendations for three different lighting setups that make it all possible, from budget-friendly to middle of the road to full-wattage premium.
Craving more intel?
Continue to the bottom for Contender’s Top 10 Tips For Riding at Night.
Three Lighting Setups, For Every Type of Rider
Based on Contender’s handpicked collection of bike lights, along with what we’ve personally rode and tested, three lighting setups rise to the top, each with its own pros and cons, and related price point.
Setup #1: Budget Friendly, DIY Option (~$75)
Handlebar Light:
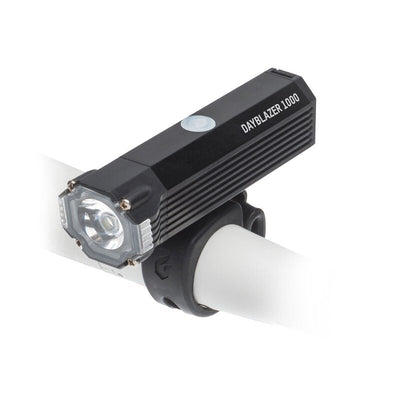
- Blackburn Dayblazer 1000: 1000 lumens; 140 grams; attaches to helmet or bars via thick rubber band; casts a spotlight type beam; up to 1.5 hours of runtime on highest setting; three stationary settings–Blitz, High, Low–and two flashing settings; micro USB-rechargeable, 5 hours to charge
Helmet Light:
-
Existing headlamp: (hiking, trailrunning, or camping)
Pros |
Cons |
|---|---|
|
|


Ride Review:
Full disclosure, I did not test this specific configuration, but have previously ridden with a headlamp attached to a helmet, and used to own the Blackburn Dayblazer 1000. With most headlamps delivering in the ballpark of 300-500 lumens, it's easy to see that most of the light in this setup will come from the Dayblazer, with the headlamp providing modest, supplemental coverage around corners and off-trail, as needed. While the headlamp will spread more, the Dayblazer casts more of a spotlight style beam–strong when looking straight ahead, but a gradual fall-off towards one’s periphery.
I would feel comfortable riding this setup at dawn, dusk, or on trails in the SLC area with more ambient light–Parley’s Pointe or Bonneville Shoreline Trail from the Zoo–but would be hesitant to go into trails that cut through thicker forest, such as Road to WOS, Park City Mountain Resort, or the north side of Corner Canyon.
Consider this set up if…you’re looking to keep your costs down, you’re more of a DIY type, or you’re looking to dabble in night riding before fully committing.
Setup #2: Middle of the Road (~$220)
Handlebar Light:
- Blackburn Dayblazer 1500: 1500 lumens; 149 grams; attaches to helmet or bars via thick rubber band; casts a spotlight type beam; up to 2 hours of runtime on highest setting; three stationary settings–Blitz, High, Low–and two flashing settings; micro USB-rechargeable, 5 hours to charge
Helmet Light:
-
Blackburn Dayblazer 1500: Same as above
Pros |
Cons |
|---|---|
|
|

 Ride Review:
 As my go-to setup for the past two years, with dozens of rides under my belt, I’m a big fan of the Dayblazer 1500 on the handlebars and helmet. When gearing up, these lights are super easy to attach, at just 30-60 seconds per light. The lighter weight (149 grams) delivers a barely there feeling on the helmet, which I also appreciate. On the bike, the Dayblazer’s spotlight style beam is focused and uniform, providing excellent coverage for straight ahead situations, while also quickly illuminating my looks ahead around hairpin turns or offtrail into the foliage (for when creepy sounds emerge).
Downsides for me have been scarce, but for stronger peripheral coverage, I’ve found the need to look off trail here and there, which takes my eye off the prize when descending. On longer rides, I’ve also been frustrated with the limited run time on the highest beam, along with not knowing where I sit within the battery life (contrasted with the battery visibility I get from SRAM AXS to my Garmin Edge).
Consider this setup if…most of your night rides are 2 hours or less, you value simplicity and lighter weight, and your night rides are mostly in the green to blue category, with less need for wider, more peripheral coverage. In our humble opinion, this is an ideal setup for the vast majority of riders.
Setup #3: Premium Power & Trail Coverage (~$295)
Handlebar Light:
- Blackburn Dayblazer 1500: Same as Setup #2
Helmet Light:
-
Outbound Portal Bike Light: 1650 lumens; 170 grams; attaches to helmet via standard curved Action Camera Adapter, or flexible wide mount; casts a wider, horizontal beam pattern; up to 2.5 hours of runtime on adaptive mode; four stationary settings–Adaptive, High, Medium, Low–and two flashing settings; USB-C rechargeable; 3-year warranty
Pros |
Cons |
|---|---|
|
|


Ride Review:
I test rode this 1-2 combo on a 11-mile route from my home, up and around the Bonneville Shoreline Trail from Hogle Zoo, along with the H-Rock connector (Devonshire) to Parely’s Pointe. My main takeaway: this lighting combo is a blast to ride with, providing all the light one could want, in every direction.
Getting ready to roll, the Blackburn was quick to attach, per usual, but the Outbound Portal was a bit more work, requiring that I strap on and cinch down the Action Camera Adapter, and then attach the light. Putting my helmet on, the extra 20 grams of the Outbound vs. the Dayblazer was immediately noticeable, feeling heavy on the head for 15-20 minutes, and then fading into the background. Once on the trail, I experimented with different beam strengths on both lights, before settling on mid-beam on the Dayblazer, and Adaptive Mode on the Outbound. With this combo, my straight-ahead light from the Dayblazer was more than sufficient without draining the battery, while the wider spread from the Outbound augmented my down-trail looks, while also brightening my periphery and looks around corners–all without the need to take my eyes off the trail. In brief moments with thicker foliage, the highest beam on the Outbound Portal provides visibility and security in spades, while the ability to flip the light skyward when encountering other trail users is useful and thoughtful, reinforcing good trail etiquette for all parties. Brass tacks, the Outbound Portal is bright enough, straight ahead and side to side, that if I had to roll with a single light, this would be it.
Consider this setup if…price is not an issue, you want longer battery life, you seek the best of both straight-ahead (Dayblazer) and peripheral, wide-spread brightness (Outbound Portal), and you want the ability to roll with a single light (Outbound Portal) for certain scenarios.
Top 10: Contender’s Tips for Riding at Night
In no particular order, our team has found the tips below to be especially on point when it comes to night riding, ensuring night time is the right time.
-
Go With a Two-Light Setup (Helmet, Bars). More on this below, but the TL;DR is your handlebar light illuminates where you are, while your helmet light shows where you’re going, helping to look further down trail and seeing around corners, while also peering into the woods, or looking at your watch or bike computer.
-
Use a Bike Bell. Helps to scare off potential animals, lets other riders know you’re coming. No one likes to be surprised out on the trails, and this is especially true at night, when senses are already on high alert.
-
Ride Trails You Know. Given night riding’s unique ability to make the familiar seem new, it’s best to stick with trails you know, so you’re not surprised by a wicked rock garden or aggressive drop you didn’t know was coming. Save new trail scouting for daytime excursions.
-
Tamp it Down. We fully support full send whenever possible, but until one gets a handle on night riding, and related to our last point, tamping down your descent by 10-15% will help to keep the rubber side down, and your spirits up.
-
Stay on Grid. In other words, night riding + no cell phone signal is no bueno. Instead, stay within cell signal, and stay safe.
-
Phone a Friend. Riding is always better with a friend, but especially so at night, for safety purposes alone.
-
Stack Your Ride With Dusk or Dawn. Reduces your reliance on batteries, extends your ride time, and delivers views and photo ops in spades.
-
Add a Rear Light. Especially critical if rolling from your home to the trailhead, to make sure cars can see you.
-
Charge Your Lights the Night Before. Somewhat self-evident, but if you’ve ever known the frustration of getting up early or looking forward to a night ride, only to find yourself with dead batteries, then you’ll appreciate this one.
-
Layer Correctly–and Bring Extra Gloves. Don’t let a cold head or hands or torso undermine what would otherwise be a ‘rippin good time. Layer correctly, leaning on our recent MTB layering and apparel guide if you need a refresher. Personally, extra gloves allow me to shed the sweat soaked ones I wear on the up, ensuring I have a dry, toasty option for the down.
Bottom Line
Ryan’s advice to me two years back has proved to be right on the money. Not only is night riding a cool experience, breathing new life into daily driver trails, but it truly unlocks a feeling of abundance over scarcity. More time, more rides, and everything that goes with it, from the physical to the social, the mental to the emotional.
If you’re ready to let there be light, we’d love to help you make it happen.
Stop by the shop, send us a message send Contender a message, or give us a call at (801) 364-0344. We’d love to get you kitted up, and riding after dark.